
Ubuntu 16.04 & Tomcat 8.5
This is a totally random post. Sadly, my last post was from July 2018 and I’m sitting on about 15 draft posts that I’ve been too lazy to finish. Probably never will…
Ubuntu is hands down my favorite Linux distro. Desktop, Server, Studio and not to mention all of the great variants forked from Ubuntu- Mint, Elementary, etc, etc. And for some reason I am attached to 16.04! In this post I’ll walk-through configuring Tomcat 8.5 on Ubuntu 16.04. If you’re familiar with this combination, you’ll know it’s not as straight forward as it should be. I have seen some bash scripts out in the wild that handle this for you, but I believe it to be helpful to understand what’s actually going on under the hood. So, I figured to give a step by step walk-through of getting this up and running. It’s also important to note that Oracle recently changed the way they license java, so i’ll be using OpenJDK for this.
Some pre-reqts and assumptions
- You’re familiar with Linux in general and have a comfort with a CLI
- A sudo account & root privileges
- UFW is preconfigured for port 8080
Install Java
Update the linux package management index
sudo apt-get updateActually install java. Ubuntu 16.04’s default java install is essentially OpenJDK, which will work perfectly for this scenario. Tomcat only needs JRE technically to run, but in my particular scenario I will plan to run a JSP based web app and therefore need to convert JSP into java servlets. So, we’re going to install the full JDK (which includes the JRE).
sudo apt-get install default-jdk -yTo make life easier down the road let’s set the JAVA_HOME environment variable. First let’s find out where java is installed. If you’re following this post, then there should be no surprise here. 🙂 Copy this, as we’ll paste it into the environment variables config.
sudo update-alternatives --config javaAs of this post, it should be /usr/lib/jvm/java-8-openjdk-amd64/jre/bin/java.
Now open the environment variable config with your editor of choice (I’m using nano here).
sudo nano /etc/environmentAt the bottom of this file add the path of where java is installed that we recently obtained and save this file.

Reload the environment file with the following:
source /etc/environmentNext let’s update the bashrc to export out the java home variable. Open this with nano again.
nano ~/.bashrcAdd these two lines to the end of this file and save.
export JAVA_HOME=/usr/lib/jvm/java-8-openjdk-amd64/jre/bin/java
export PATH=$JAVA_HOME/bin:$PATH
Reload the bashrc script.
source ~/.bashrcTo verify this you can simply echo back the java home variable and you should see the location of where java is installed.
echo $JAVA_HOMEAt this point Java is all set and good to go!
Installing Tomcat 8.5
A good rule of thumb is to run tomcat under it’s own account and not use root or your primary sudo account. So, let’s create a new group and account. Here’s some options we’ll use:
-s /bin/false = disable shell access.
-g tomcat = assign the new user to the group tomcat.
-d /opt/tomcat = define the home directory for the user.
sudo groupadd tomcat
sudo useradd -s /bin/false -g tomcat -d /opt/tomcat tomcat
Now make your way into the /opt directory and download Tomcat. At the time of writing this I’ll be installing version 8.5.45. You can get the latest version of 8.5 here: https://tomcat.apache.org/download-80.cgi. Since we’re on linux, make sure to get the tarball link.
cd /opt/
sudo wget http://www.trieuvan.com/apache/tomcat/tomcat-8/v8.5.45/bin/apache-tomcat-8.5.45.tar.gz
Extract the tarball archive to the /opt/ directory and rename the folder to “tomcat”.
sudo tar -xzvf apache-tomcat-8.5.6.tar.gz
sudo mv apache-tomcat-8.5.6 tomcat
Now let’s change the owner of the tomcat directory to the newly create tomcat user from a previous step. Then we’ll make all files within the tomcat bin directory executable. When making the files in the bin directory executable you more than likely will need to escalate to root.
sudo chown -hR tomcat:tomcat tomcat
sudo -i
chmod +x /opt/tomcat/bin/*
exit
Similar to earlier, we will want to edit the bashrc file to export the tomcat install location. At the end of the bashrc file add: “export CATALINA_HOME=/opt/tomcat“
sudo nano ~/.bashrc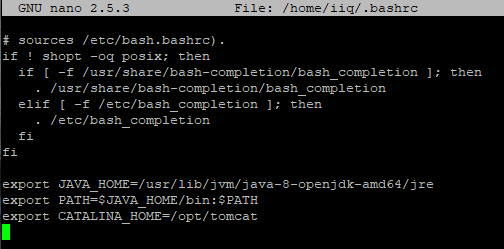
Reload the bashrc file.
source ~/.bashrcJust to verify, you can always echo back the newly create tomcat variable and it should display “/opt/tomcat”
echo $CATALINA_HOMEAt this point Tomcat is all installed.
Testing & Systemctl Config
Let’s start Tomcat and then navigate to the default port 8080 to ensure the web server has properly started up. You can simply navigate to the bin directory of Tomcat or take advantage of the variable we created. Before even jumping to a browser, you can confirm by running the netstat command.
sudo -i
$CATALINA_HOME/bin/startup.sh
netstat -plntu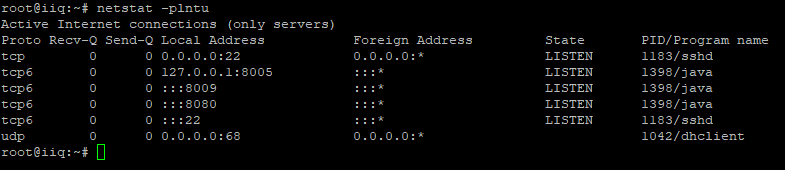

Now let’s shut Tomcat down, ensure it will be running under the Tomcat user, and lastly create the systemd service file.
sudo -i
$CATALINA_HOME/bin/shutdown.sh
chown -hR tomcat:tomcat /opt/tomcat/
cd /etc/systemd/system/
nano tomcat.service
This should create a new blank service file. Copy the below text into this file and save it.
[Unit]
Description=Apache Tomcat 8.5 Servlet Container
After=syslog.target network.target

[Service]
User=tomcat
Group=tomcat
Type=forking
Environment=CATALINA_PID=/opt/tomcat/tomcat.pid
Environment=CATALINA_HOME=/opt/tomcat
Environment=CATALINA_BASE=/opt/tomcat
ExecStart=/opt/tomcat/bin/startup.sh
ExecStop=/opt/tomcat/bin/shutdown.sh
Restart=on-failure

[Install]
WantedBy=multi-user.target
At this point let’s reload the systemd daemon and start up Tomcat.
systemctl daemon-reload
systemctl start tomcat
You can even verify that everything is up and running with the following:
systemctl status tomcat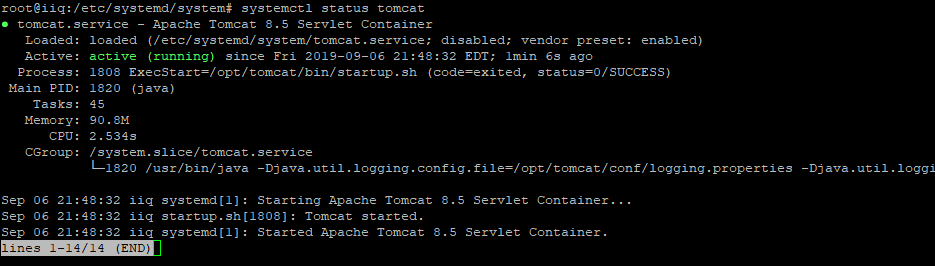
Lastly, lets add the Tomcat service to start at boot time. This way Tomcat is always running, even after a reboot.
systemctl enable tomcatRecap
As a recap, we’ve accomplished the following:
- Installed and configured java
- Create the tomcat user (think service account)
- Installed and configured Tomcat 8.5
- Created the Tomcat service and added the Tomcat service to boot at start time.
From here you could further configure Tomcat, such as the tomcat-users.xml or context.xml files, or whatever your needs are.