
Ethereum Mining
So, it’s been a few years since I was involved with any cryptocurrency, Bitcoin to be specific. In fact, it was sometime around the Fall of 2013. Microsoft even allowed you to renew your Xbox Live subscription using the cryptocurrency. Of course, I’m kicking myself for not sticking with it. Oh well… here we are 2018.
Bitcoin as of lately has become extremely volatile, especially over the last 2 months (as of writing this); having a low of $7,200 and a high of $19,200! And because of this I decided to get into Ethereum and understand this crytocurrency at its core, thus leading to me mining it!
So, I’m not going to get into what Ethereum actually is or even what cryptocurrency is. So, if you’re here to learn what those are then I recommend the below sites. I would read them in the order below. At the end of the day cryptocurrency is essentially a blockchain technology. Otherwise, you can skip this part if you want since the primary goal of this post is on mining Ethereum.
So, with all of the obvious stuff out of the way, here’s some assumptions on how I intend to mine Ethereum:
- Mining on Windows platform
- Will mine in a pool (not willing to invest enough money to solo mine) 🙂
- Using Exodus for my primary wallet
- Using Nvidia GPUs
Here’s a recap of everything I’ll be using:
Hardware (core components)
- Mobo: Asus Prime z370-A
- CPU: Intel Core i3-8100
- PSU: 2 x EVGA SuperNOVA 650w G1 Gold
- GPUs: 2 EVGA Geforce GTX 1070 8GB, 4 x Asus Geforce 1060 6GB OC & 2 x PNY GeForce GTX 1050ti 4GB OC
- Risers: Mailiya PCI-E 16x to 1x powered adapter; USB 3.0
Software
- OS: Windows 10 Pro
- Mining Software: Ethminer
- Mining Pool: Ethermine
- Nvidia Driver version: 390.77
- GPU OC software: EVGA Precision XOC
Let’s Get after it!
- Build your rig. If you can build a PC, then you should have no issues here. The obvious difference here is you have more GPUs than normal. It’s also highly recommended that if you’re building something with multiple GPUs that you utilize an open frame rig. This is necessary to help keep things cooler. I’ve seen all kinds of things done- hanging the GPUs with zip ties on a wire shelf or buying a fancy $200+ frame. I originally opted for an open frame for 6 GPUs from Amazon that ran me about $40. I eventually acquired 2 additional GPUs in addition to my 6, so I needed more room. I also switched to using 2 PSU, so a bigger platform was needed. I could not come to terms with what people were charging for a 8 GPU frame, so I built my own. I’m big into DIY, so this allowed me to get creative and have some fun! I’ve always been into building things using t-slotted aluminum framing. I’ll just throw this out: https://8020.net/45-4545-lite-black-fb.html
- BIOS Settings. This is critical and I learned the hard way. It’s not normal at all for there to be more than 2 GPUs in a computer, let alone 8! So, there’s two things you must change in the system BIOS of the motherboard for this to work.
- Enable +4G –
This allows the mobo to even recognize more than 4 GPUsThis allows memory mapped I/O for a 64-bit PCIe device to be set to 4GB or greater. - Ensure all PCIe slots are changed from “Auto” to “Gen 2” – Since we’re using risers, Gen 3 or later simply won’t work here.
- Enable +4G –
- Install Windows 10. I bought a bundle of Windows 10 Pro keys about a year ago and I happen to have a few unused, so this worked out for me. You absolutely do not need to get a Pro license, the Home edition is perfect. It should noted that I started out originally mining on ubuntu server. I preferred running this on linux, but I ran into all kinds of issues with wifi and the nvidia drivers and most importantly overclocking and under-volting the GPUs, in addition to other issues. I eventually did get everything working on ubuntu in a VM, but I went ahead and stayed on windows. Mainly because the final thing I could not resolve was under-volting the cards on ubuntu. If you do decide to mine on linux, I would highly recommend either SMOS and/or HiveOS.
- Install Nvidia Drivers. Make your way over to Nvidia and download the correct drivers. The link just provided should be the correct drivers if you’re using any GeForce 10 series cards. You should also confirm that all GPUs are correctly recognized in Device Manager before installing drivers. If they’re not recognized then you may need to confirm the necessary bios settings are in place.
- Install the AIO. AIO? Yes, the AIO, All-in-One. This will make sure all runtime libraries that are used by Ethminer are properly installed on your machine. This includes things like the vcruntime140.dll and msvcr120.dll and a bunch others. Here is where you can download this: AIO Download. I ran into so many of these libraries missing that I ultimately found this package installation utility created by someone (I’ll update this once I actually know who to give credit to). It was exactly what I needed. I lost a good 3 hours of my life tracking all of these issues down. FYI, I have scanned and confirmed this install package is clean and safe to install, however- please take due care and due diligence to ensure this is in fact safe to install on your system and in your circumstances. That link is also to Dropbox account I own.
- Get a Wallet. I will have a section in the appendix where I talk further about wallets. For simplicity, I use the Exodus desktop wallet. Have your address ready to configure your miner with. Side note, I would not recommend mining directly into a wallet that is associate with an exchange or a cloud based wallet. Since you will never be able to obtain the private keys of these kinds of wallets- i would not mine directly to them.
- Download Ethminer. This is the software that allows your GPUs to crunch some numbers! Since we’re on Windows, this is already compiled for us and ready to use. Download the latest version here. At the time of this post version 0.13.0 is the latest stable version. I would recommend creating a new directory in the C drive (i.e. C:\eth) and stored the extracted executable here. Take note, I chose Ethminer because there are no mining fees, unlike Claymore (which is 1%). There’s claims that Claymore if more efficient, but I did not find this to be the case at all.
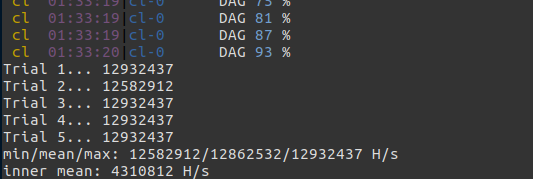
- Run a benchmark test. At this point you should be ready to begin mining, but first let’s run a benchmark test to ensure all of your GPUs are up and running properly. You’ll also get some insight into what hashrate your rig is capable of. Open up the command prompt and run the following command: ethminer -U -M. Once complete you can then divide your H/s value by 1000000 in order to see your hashrate in MH/s. You should see something like this as a result of a benchmark test:
- Choose a mining pool. Since you’re ready to begin mining and we’re going to mine in a pool, you need to choose one. Again, I’ll provide some additional info on pools in the appendix. For now, we’re going to use Ethermine.
- Create a batch (.bat) start file. Ready to start mining? Open notepad (or whichever text editor) and place the below into the file and save as a .bat file (i.e. start.bat).
- setx GPU_FORCE_64BIT_PTR 0
setx GPU_MAX_HEAP_SIZE 100
setx GPU_USE_SYNC_OBJECTS 1
setx GPU_MAX_ALLOC_PERCENT 100
setx GPU_SINGLE_ALLOC_PERCENT 100
ethminer.exe –farm-recheck 200 -U -S us1.ethermine.org:4444 -FS us2.ethermine.org:4444 -O <Your_Ethereum_Address>.<RigName> - This is critical! Replace the <Your_Ethereum_Address> with the ETH address to you wallet. You don’t want to mine into someone else’s wallet!!
- Using the <RigName> is entirely up to you. If you only have 1 rig running, then I would simply leave this blank. If you have multiple running, using this can help you identify your rigs.
- setx GPU_FORCE_64BIT_PTR 0
- Run the bat file. This should open the command prompt and you’ll watch as your rig begins to mine some Ethereum!
After you’re up and running here’s a few things I would do (all of which I have done):
- Enable auto logon. More than likely this machine will be solely used for mining. So, I would enable auto-login. This also helps in case your rig needs to be restarted, it won’t be stuck at the login prompt.
- I purposely did not mention overclocking or under-volting/under-powering the GPUs. I probably need to have entire post dedicated to this. However, I will mention the most critical thing to overclock is the memory on a GPU, not the core. There’s a fine line of precision to ensure system stability and maximizes the hashrate out of the GPUs. More to come on this. For now, got out and download MSI Afterburner and have this installed and ready to use.
- Run your start.bat file at startup. There will be cases when your rig will need to be restarted, so having Ethminer fire up at startup is a smart thing to do. Also, you should also have MSI Afterburner fire up at startup.
- Speaking of restarting, I would create another batch file to restart your rig, or powershell script, or whatever. Create a scheduled task and run this restart script once a week. This will take you off line for no more than 3 mins once a week. You could even get fancy and within your restart script you could stop Ethminer, wait 2 mins, and then restart the computer. This would give your GPUs a few minutes to not only rest, but with a restart of the computer, the heap and stack of both on-board memory and GPU memory can be cleared. Also, since we’re running a desktop version of windows it’s not designed to run 24×7 like windows server, so a once-a-week reboot could be a great preventive thing.
- Enable remote desktop (RDP). You’ll find out pretty quickly your rig generates some serious heat and additional noise. So, if you’re like me this thing is NOT in my home office and having some remote management is important.
- Speaking of RDP, using something like RealVNC might be a great option. I happen to have a jumpbox in my home network that I’m able to VPN into from the outside world and therefore I can easily access anything within my network. If you don’t have a home network setup to support this and would like to have some remote management from outside of your LAN, then RealVNC is a great option. Just make sure to secure this! I envision this crazy idea that someone remotely accesses your mining rig, changes the wallet address and boom! Just like that your hard earned mined Ether is gone!
- Auto restart after power failure. Running your rig on a UPS would be ideal. But, I would do 2 additional things just in case.
- Ensure the “Automatically Restart on System Failure” is enable within Windows. You can find that here: System & Security > System settings in the Control Panel > Advanced System Settings > Advanced Tab > Startup & Recovery Settings.
- If you’re using an Asus mobo, go into the BIOS settings and ensure auto restart after power loss is also enabled. This of course is a BIOS feature of many motherboards, not just Asus.
- Get yourself a Wemo Insight Smart switch. Flat out, these are awesome! You can get a little more remote management of your rig, from a power perspective and most importantly you can get some insight into exactly how much power your rig is pulling from the wall. For example, I noticed that my rig was not mining while I was out and about. I simply went into the Wemo app and cycled the power. A few minutes later everything was back up and running. This is of course you if followed my previous advice to enable auto-restart from a power loss. You can then get fancy by using IFTTT for whatever you can think of.
So, that’s that! I quickly threw this together and I’m sure I will be back for corrections and/or additional details.