

Securing Photos with Amazon S3
Amazon S3 is a service I have been using for quite some time. Hands down it’s one of the greatest services AWS has to offer. The versatility and power of S3 is unreal!
In fact, I’m currently running my own private cloud storage solution using a forked version of the free open-source software (FOSS) Nextcloud- which is currently using S3 as the underlying storage mechanism. Check out my Cloud Storage; Your Way post if you’re interested in how I deployed this using a very inexpensive Lightsail instance and integrated it with an S3 bucket.
But for this post, I’ll share the journey and growth of my photography workflow and how S3 plays a part in my backup strategy.
What is S3?
There’s tons of resources, sites, and blog posts out there on what S3 is and various ways it can be used, so if you don’t know and need a primer on the service I would go read through AWS’ own service overview page (https://aws.amazon.com/s3).
In Amazon’s own words here the description of S3:
Amazon Simple Storage Service (Amazon S3) is an object storage service that offers industry-leading scalability, data availability, security, and performance. This means customers of all sizes and industries can use it to store and protect any amount of data for a range of use cases, such as data lakes, websites, mobile applications, backup and restore, archive, enterprise applications, IoT devices, and big data analytics. Amazon S3 provides easy-to-use management features so you can organize your data and configure finely-tuned access controls to meet your specific business, organizational, and compliance requirements. Amazon S3 is designed for 99.999999999% (11 9’s) of durability, and stores data for millions of applications for companies all around the world.
In it’s simplest form, S3 is an object based storage service. It is designed to house unstructured data and has a flat structure. Although you’re able to create “folders”, these are only logical objects to help you visually see and organize your objects. It’s fair to say the folders essentially serve as prefixes to your data.
For the very simple purpose of this post, I’m going to focus mainly on 2 storage classes of S3: Glacier & Glacier Deep Archive. Here’s some very high level things to know about the 2 storage classes:
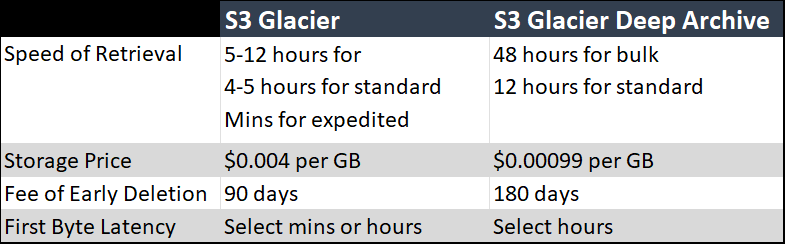
Pay particular attention to price. It’s hard to beat this price for the use case I have around backing up and securing data.
Photography Workflow
You might be wondering why would an individual need or use a service like S3 in the first place? The use cases from an enterprise perspective almost seem endless, but there’s certain use cases for an individual. I’ll get to this shortly.
Just to give some history, I once owned and operated a photography business and experienced a hard drive failure sometime in 2007. In the digital age of photography this was catastrophic! At the time I had no backups, wasn’t using a NAS storage device, nothing. Luckily, I didn’t loose any photos that were commissioned work; such as a wedding, engagement photo session, or one of the many endurance races I shot. I guess it’s not entirely true I didn’t have backups- I did have some burned DVDs with RAW photos only.
After this I went all in on a NAS (network attached storage) device and designed a workflow that not only ensured my photos were backed up, but readily available regardless of the device I was using.
After getting a 2-disk bay Synology NAS, I become adamant about immediately getting the RAW images off the memory card secured. I ultimately changed my photography workflow to the following:
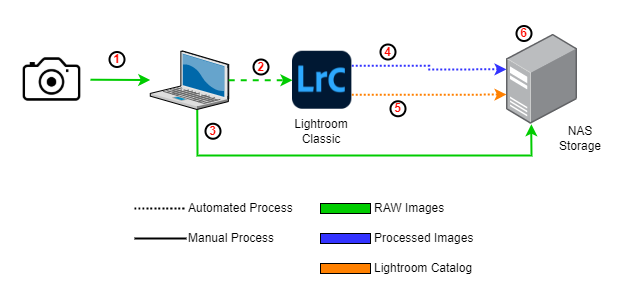
- Manually copy images from camera/memory card(s) to laptop
- Using Lightroom (aka LrC), import the photos into my catalog
- While the images are getting imported into LrC, I copied the RAW images over to the NAS
- Once done editing photos and creating a collection, I would let LrC export directly to the NAS (JPEG and/or TIFF)
- Upon closing LrC, I backup the catalog automatically, also to the NAS
- I have several file shares created on the NAS and of course one is dedicated entirely to photography. I have only a few top level parent folders- 3 of which being “raw_photos”, “processed_photos”, & catalog_backup
Here’s an example of what that folder structure looks like:

The Cause
I followed this same workflow for several years and never had issues. But in Sept of 2017 (literally over my birthday) Hurricane Irma approached the west coast of Florida. Within 12 hours of making landfall in the Naples area, the hurricane was projected to be at Cat 4 strength passing directly over us! Just prior to this, I can remember telling my wife we’re not going anywhere unless we’re getting a direct hit as a Cat 4. Uh oh, That was looking to materialize over the next several hours. As we packed up our car to head out of town one of the things I grabbed was none other than my NAS server!
Long story short, the hurricane weakened down to maybe a Cat 1 and luckily we had no damage to our house. Unfortunately, that wasn’t the case for everyone. However, through this experienced I realized the NAS server itself is just a thing that can be easily replaced, but not really the case for 10’s of thousands of photos stored on it. So, I decided to modify my photo workflow to use some offsite backup to address this gap of loosing not only my photos, but my data in general.
The Effect
I pay for an Office 365 personal subscription- 95% of the original reason was for the 1TB of cloud storage that’s included with OneDrive. I almost thought to myself, this is easy, just begin syncing a folder with my photos into OneDrive. Done. But, I was quickly approaching the 1TB amount of storage for my photos (RAW, processed, & catalog backups). Not to mention over time I began to shoot with a full frame sensor camera, so the RAW file sizes were getting out of hand quickly. So, I modified my workflow and processes to include backing up my RAW images, processed photos, and LrC backups to Amazon S3.
Using the Glacier Deep Archive storage class at a price of $0.00099 per GB, per month, makes it a very attractive option. For example, 1TB data stored would cost approximately $0.99 per month, $11.88 per year. This cost is for storage only. There are of course costs for requests and data retrieval as well as data transfer, so you would definitely want to understand that as well. The ultimately hope is that I never have to do any retrievals.
So what does an updated workflow look like?
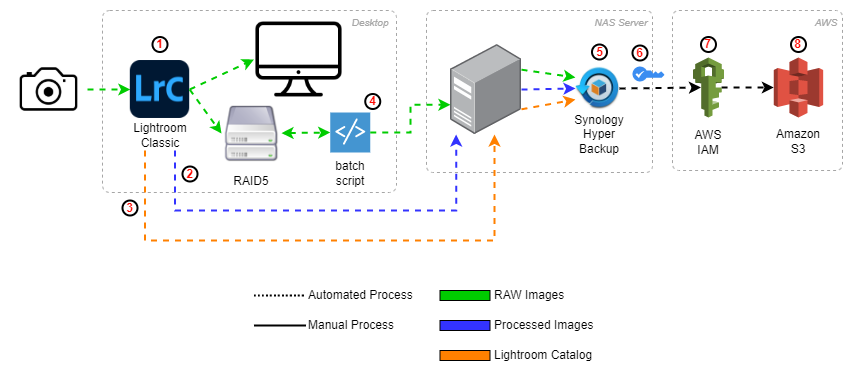
- After plugging camera/memory card into PC, allow LrC to copy raw photos to the RAID and simultaneously import photos into LrC catalog
- After editing photos, create collection and export processed photos directly from LrC to NAS server
- Upon closing LrC, I backup the catalog automatically to the NAS
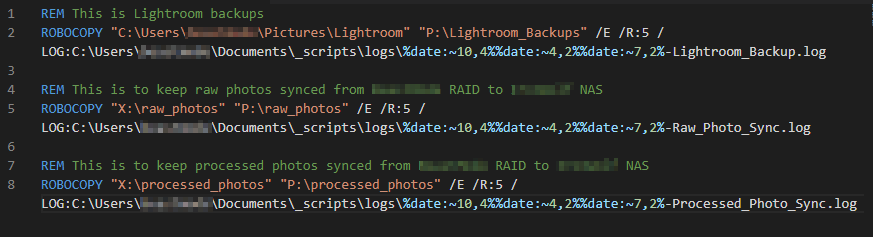
- I have a batch script (screenshot below) scheduled to run nightly which syncs the RAID to the NAS, primarily focused on the RAW photos
- Using Synology’s Hyper Backup, I run a bi-weekly differential backup to Amazon S3
- I encrypt the backup data locally using a self-generated key pair just prior to backing up to S3. This way data is already encrypted prior to getting into AWS
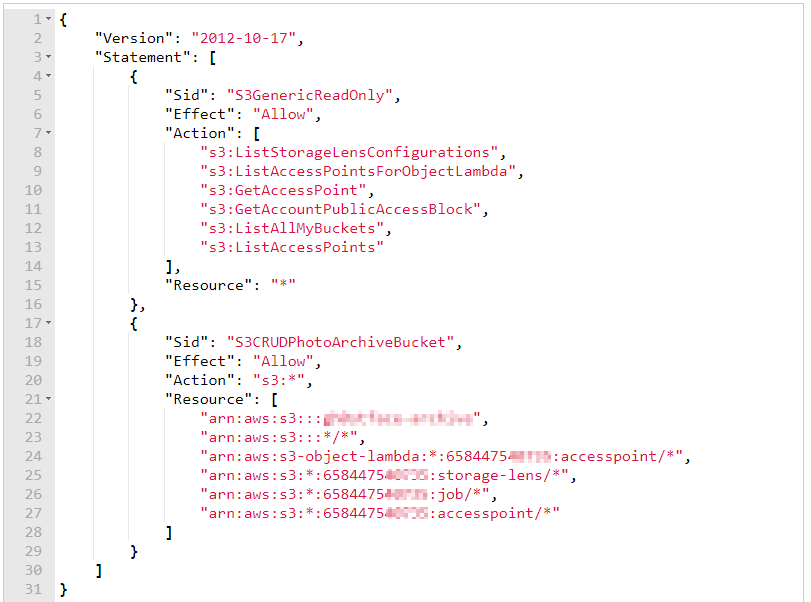
- Using a dedicated AWS IAM user, provisioned to a role that has a very specific policy (screenshot below) only for the photo backup S3 bucket
- Amazon S3 bucket with intelligent-tiering archive config set (screenshot below)
Obviously, there’s a lot more going on with this flow- however everything is fully automated! The manual steps are plugging the memory card into the PC and of course going through/editing the photos. One big thing that I didn’t spend too much time talking about is the RAID setup on my desktop. When I first started all of this I worked primarily from a laptop. Today, my main computer is a desktop with a 5 disk, RAID 5, array. This way there’s local redundancy with much faster read speeds (a huge plus for interacting with the massive RAW files with LrC) and backup to the NAS (local) and S3 bucket (remote).
Old School Scripting
I’m a bit old school with how I backup data from the local PC to the NAS- I use good ‘ol robocopy! Nothing complicated at all and very straight forward. Get data from the RAID to the NAS. I have this scheduled to run on a nightly basis and configured to run if the previous scheduled time was not run. I also dump a log file so I can see what happened if something goes wrong. I have a separate batch script that deletes log file older than 30 days- this also runs nightly.
Least Privilege
Being an Identity professional I of course have to talk about how to properly (or some what properly) use AWS IAM to access the S3 bucket. I have to preface this with the fact that the topic of this post is entirely for my personal use. If this was an enterprise solution- this would be an entirely different post. And to that note, if this was an enterprise solution (for sake of the IAM user), AWS Secrets Manager should be used to get some automated rotation of that access key.
For starters, I use a dedicated IAM user that has only programmatic access. I then created a dedicated role for that user. And lastly I attached a custom access policy to the role. Therefore this IAM user has only the access needed for the automated backups from the NAS server to the S3 bucket. Here’s the policy attached to the role for this user:
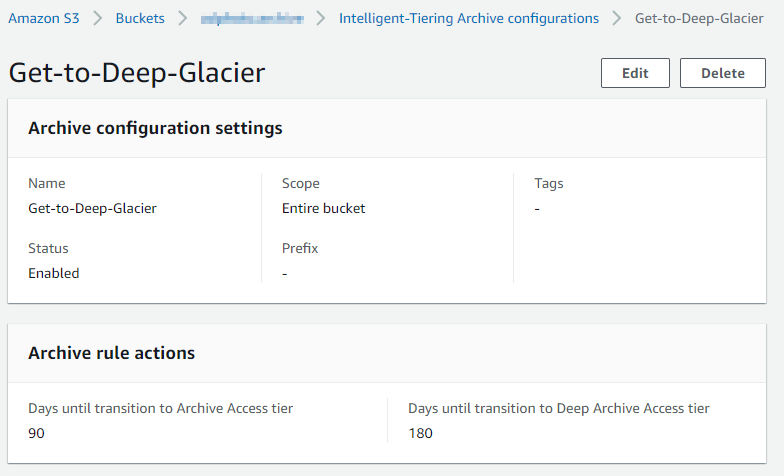
Get to Deep Archive
The Synology Hyper Backup I’m using unfortunately does not allow me to automatically set the storage class to Glacier Deep Archive as I’m creating the backup. So, I take advantage of the “Intelligent-Tiering Archive Configurations” within S3. This simply lets me define some basic rules to automatically set the entire S3 bucket to automatically change the storage class to Archive Access after 90 days and ultimately to Deep Archive Access after 180 days. Depending how you do backups into S3 and if you use versioning on the bucket, you can also setup some lifecycle rules to automatically set older versions into a lower tier storage class. Or you could outright delete older versions based on rules you set.
Pro tip: you could even do more advance stuff with creating some simple lambda functions to interact with the objects in the bucket.
Conclusion
If you’ve read this far- thank you! My hope is there’s at least some bits and pieces of this you have found useful. Whether it’s on the photography workflow, local storage/backup, or the AWS aspects (remote backup)- hopefully it can spark some creative thinking as to how technology can help with your everyday life!